I’ve previously talked about snippets and how great they are for automatically generating code. Still, I’ve also found that writing a bunch of code to write a simple expression might be a bit overkill. We may need to insert code in the middle of an existing document easily and may not want to go through the trouble of writing a complex generator that modifies a file. While creating files from scratch is easy to do with a code generator, it is tough to edit an existing code file without using AST parsing or regular expressions. Just thinking about that last part about regular expressions makes me shudder. So what do you do if you need quick, easy replicable segments of code? One way to solve this is Snippets, and I’m going to show you some easy ways to set up your very own custom code snippets in Visual Studio Code. The best part is that it requires little to no code to get started!
What is a Snippet?
What is a snippet, you might be asking? Well, at an elementary level, they’re small sections of code templates that make it easier to repeat code. In layman’s terms, they’re your custom autocomplete functions inside of the text editor. In Visual Studio Code, they use TextMate style snippets to compose the repeatable section of code. These snippets can be put into snippet files that can be scoped to all projects for Visual Studio Code or just a single individual project. Visual Studio Code even comes with snippets by default, and you can download more on the Marketplace! Let’s add a few snippets so that you can see what I am talking about.
Creating our First Snippet
For creating our first snippet, let’s do something relatively simple, like add a snippet for adding an error message to a JavaScript file. That will be an easy first task for us to get our feet wet with how snippets work.
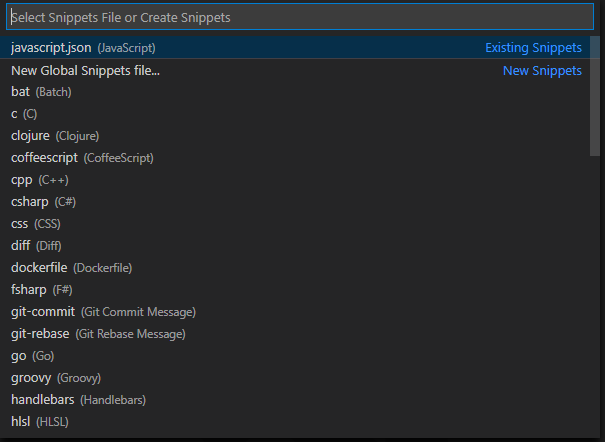
1 – Let’s start by adding some user snippets. Using the application menu, go to file > preferences > user snippets.

2 – Select javaccript.json because we want to create a JavaScript snippet.
3 – Enter the following into your snippet file. (Clear the file’s content if this is the first time you’re creating snippets.)

- The outermost squiggly ({}) braces define the object that will contain all snippets for JavaScript.
- The key “error” is the name of the snippet we are creating.
- The line that starts with prefix is an array for shortcut phrases to type inside the document to make the prefix option available for selection.
- The body key-value pair contains the content of the snippet.
- The description line contains a brief description of the snippet’s purpose. It is not required but makes it easier to figure out the snippet if you have many snippets with a similar prefix.
Testing Out our New Snippet
Ok, so we’ve created our snippet, but how do we use it? First, open any JavaScript file. Then type error. You’ll see a dropdown appear with our new snippet in the list of available options. You can tell it is our snippet because the prefix will be “error” on the left, and to the right, it will have our snippet’s name.
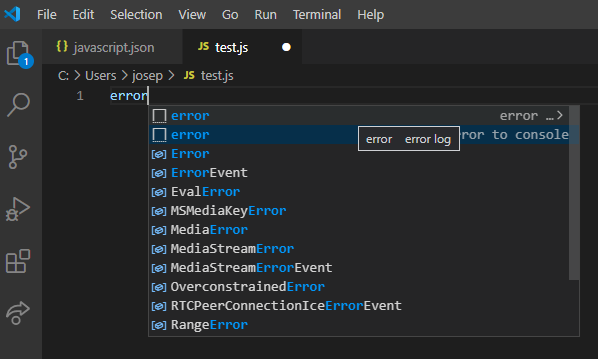
If you select the snippet, it will insert the code snippet that we created above.

Excellent, our new snippet was inserted! Congrats on creating your first snippet! The only problem is my message is hardcoded to be “Hello World!” and that is weird. I think we can do better and use a concept called mirroring to make this a bit better.
Mirroring
Mirroring is like creating a pseudo-variable in your snippet that can be used to reference custom typed values. If you have more than one mirror, you can tab between them. The basic mirror is set up with the syntax of ${#:Placeholder-Text}, but don’t worry if it seems confusing. We’ll edit our snippet and show you how it works.
1 – Edit the javascript.json snippet file from earlier to match this.
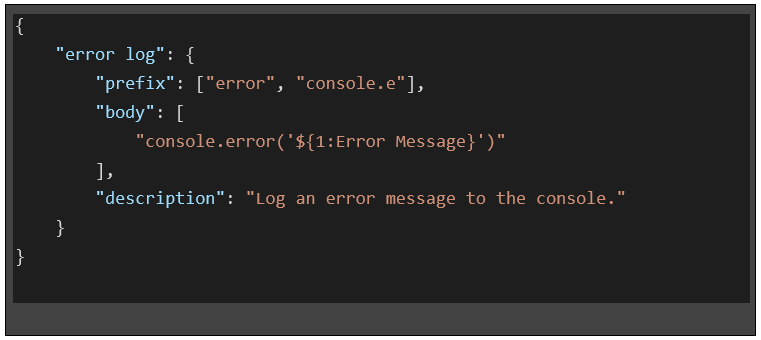
- Observe our line console.error(‘Hello World!’) was changed to console.error(‘${1:Error Message}.
- The ${1:Error message} is a snippet mirror.
- The 1 in the snippet mirror represents the tab index of the mirror.
- In our case, the message to the right of the colon, “Error Message,” represents the default text.
Using our New Code Mirror
If we follow the same steps as when we were adding our error snippet to a JavaScript file again, you’ll notice that it acts differently now. Now that you’ve inserted the snippet, it has inserted a new line, but it is now highlighting the “Error Message” section. This is so you can type and replace the content of the default message, which in our case is “Error Message.” Once you’ve replaced the contents, you can hit tab, and it will bring you to the end of your snippet. This is because you have no other snippet mirrors to replace. In this example, we covered the most basic case of code mirrors. Let’s cover another case where we might want to have two code mirrors.
Multiple Code Mirrors
Let’s create a new code snippet with more than one code mirror. Maybe we want to enter a message but also print out a variable. Here is a snippet that will do just that.
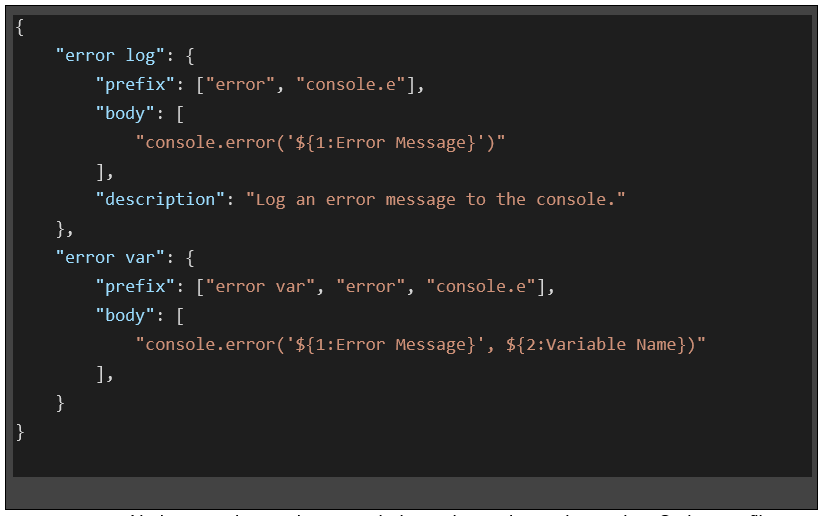
- Notice now that we have two independent snippets in our JavaScript.son file.
- The second snippet can share prefixes with the first one. We need to select the right one based on the snippet name.
- Notice that our code snippet contains two code mirrors: “Error Message” and “Variable Name.”
Using our Multiple Mirrored Snippet
1 – Ok. We’ve added our new snippet! Let’s use it the same way we did before by typing in our prefix in our case “error var” and select it from the dropdown menu.

2 – There are two areas highlighted. These are our code mirrors. You can fill them out one at a time, starting with the “Error Message” hitting tab when you are done editing the mirror. This will bring you to the next mirror.
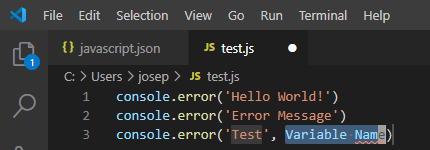
3 – You can now fill out the value of the second mirror as you did for the first.
Another Cool Thing About Snippet Mirrors
Snippet mirror values can be used in more than one place. To reuse a previously entered snippet mirror value, you can use “$#” where # represents the mirror index value you are trying to repeat. For instance, if we wanted our “error var” snippet to log the value of the variable we typed in the first mirror snippet, we could change the body to…

This would yield a snippet that has the same value in two places such as…

Practical Applications for Code Snippets
Now that we’ve been through the basics, we should think about where snippets can be applied. Is it just JavaScript, or can I use it with other languages? What about React, or Angular, or Vue? What about Typescript? Fortunately, the answer to all of these questions is yes. Generally, snippets are scoped to a single language, but you can create different snippet files and scope them however you’d like. In our example, we created JavaScript log statements, but we’ve got some practical snippet examples that can get you started with a few more JavaScript examples.
Final Thoughts
Textmate style snippets don’t just exist in Visual Studio Code. We chose to provide the examples in Visual Studio Code because it is the most popular editor by a long shot for web developers. Textmate style snippets can also be implemented in Vim through plugins and Textmate, of course. Also, SublimeText has Textmate style snippet support. The setup process might be different from how we configured our snippets for Visual Studio Code.
If you have any questions about setting up snippets or need some help, please reach out to us on Twitter @UDigTech.


